Testing Your Automated Gate Loop
Once you begin the process of installing a pave-over or a saw cut in loop, you should always test the loop prior to installation.
Pave-Over Loops or Saw Cut In Loops
First you have to determine which loop you will install. When choosing which type of loop to install, you must look at how far along you are in your project. A pave-over loop will be installed in the pavement, whether it is mounted to a rebar grid or placed on the ground and paved over.
Pave-Over Loops
Before paving over the loop, you will want to test the loop with an ohm meter by placing one lead onto one of the wires of the loop and the other lead from the ohm meter to the other wire of the loop. Through this process, you are testing for continuity through the loop.
If you do not have continuity through the loop, the loop may be bad. If placing the loop on a rebar grid, you will not want to tie it inline with the rebar. This means to offset the loop so it does not follow the rebar grid. This will affect the way the loop will react to a metal object over top of it when the project is complete. If you are placing the loop on the ground then paving over it, you must secure the loop to the ground in a manner that it will not move when pouring the pavement over top.
Saw Cut In Loop
When choosing a saw cut in loop, this can be done before or after the pavement is poured, but installation can only happen after the pavement is poured. Saw cut in loop is installed just like it sounds, saw cut into the pavement and then sealed. You will need to use the proper saw blade that is made for the pavement that you will be placing the loop into. For example: For concrete, you will want a blade that is meant to cut concrete. For asphalt, you will want to use a blade that is meant for asphalt or a combination blade that can be used for both concrete and asphalt. If you are going to be using an electric circular saw, make sure that the blade is designed for dry use cutting. Don’t forget the dust mask, safety glasses, and gloves!
The saw cut will then need to be cleaned out using a brush or blower. After cleaning the dust and debris from the saw cut, place the loop into the saw cut according to the instructions from the manufacturer. Then test the loop with an ohm meter by placing one lead onto one of the wires of the loop and the other lead from the ohm meter to the other wire of the loop. You are testing for continuity through the loop.
Loop Sensitivity
So, you have the loop installed into the pavement or into a saw cut and you are looking to test the loop for sensitivity to metal. There are a couple of testing meters that you can use that will test different aspects of the loop. One will be the ohm meter or multimeter that will test ohm. This is performed by removing the lead ends for the loop detector and then placing one of the lead ends from the meter to one of the wire ends of the loop, and then placing the second lead end from the meter to the other wire end of the loop. Many multimeters will have a tone that will sound when there is continuity. If your meter does not have a tone, another indication is that the meter needle will spike. This is indicating that the loop does not have a break in the wiring.

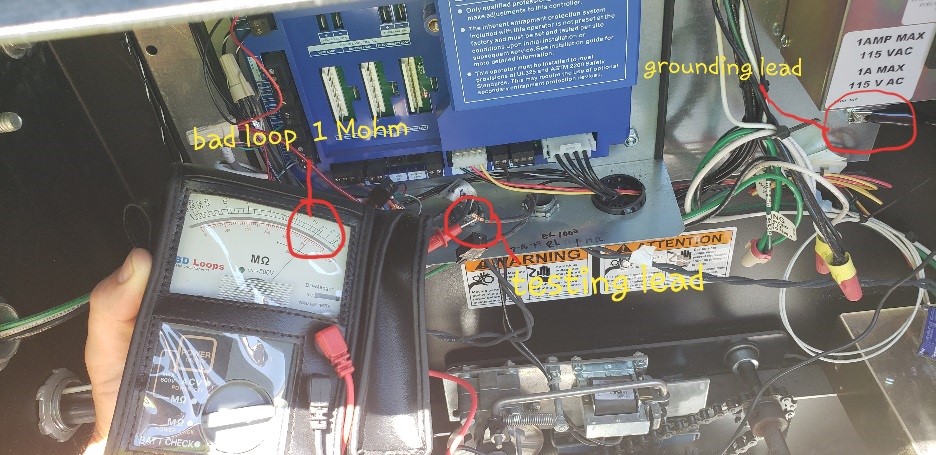
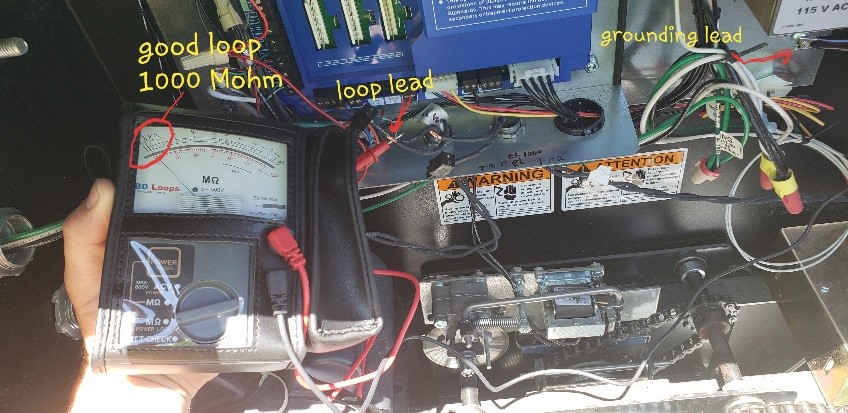
Another way to test the insulation of the loop is a Megohmmeter. This meter measures the electric resistance of insulators. This will help determine if the insulation of the loop has a cut or if water is getting into the loop causing it ground out and fail. This meter’s lead ends will not both go to the loop. One lead end will go to a ground or case ground and the other lead end will be placed on one end of the loop. This is a meter that is putting out power so when testing the loop do not touch both leads at the same time. When testing a loop, you are looking for a high reading of 45-2000 Megaohms. A range of 0 to 10 M ohms means the loop insulation is bad, and 10-44 M ohms means the loop insulation is questionable.

