Reflective Photo Eye vs. Thru Beam Photo Eye: Which Is For You and How You Should Mount It
When choosing safety devices to meet the UL325 standard, you may choose to install a reflective photo eye or a thru beam photo eye. This choice may be difficult to make as they both have pros and cons.
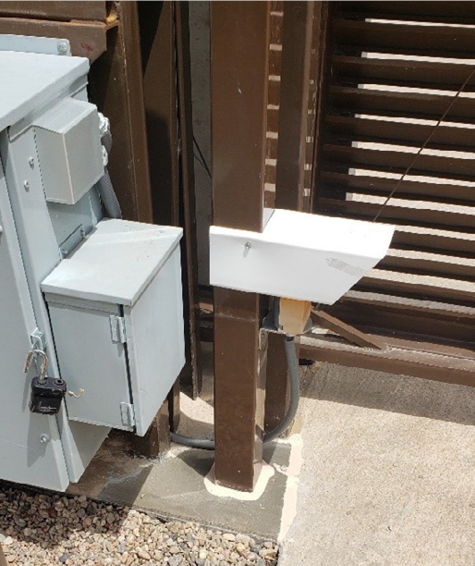
Photo Eye Pros:
- Only need power on the operator side of the driveway
- Easy to align
- Can be adjusted easily
Photo Eye Cons:
- Distances are shorter than thru
- A damaged reflector can cause the photo eye not to work
- Frost can be an issue collecting on the photo eye.
Thru Beam Pros:
- Distance the transmitter and receiver can be greater than reflective photo eyes
- Work better in inclement weather, and f
- Frost does not seem to disturb the eyes as much as reflective photo eyes
Thru Beam Cons:
- Power needs to be on both sides of the driveway
- Harder to align
- More time to install
After making the choice of what photo eye to use, the next thing you need to decide is where you are going to mount it. This may depend on what is on site or near the operator. Is it concrete, gravel, or dirt? If it’s dirt or gravel, this will make the decision easier to bury the photo eye post into a footing.
Footed Post or Plated Post
When placing a photo eye post into a footing in the Midwest it will need to be around three to four feet deep in order to avoid frost. The frost will heave the post, causing the photo eyes to misalign and the gate won’t to operate as it should. So, if concrete is surrounding the operator, a plated post may be the right option.
Using a plated post can be a great alternative to core drilling the concrete out and placing the post into a footing. When choosing to use a plated post, keep in mind that you may need to shim the plate on top of the concrete to level the post. This can cause issues when there is inclement weather. Dirt and moisture can get trapped under the plate, which can freeze and thaw which can cause the anchors to loosen. Concrete thickness can also be a factor.
Concrete thickness is another issue that can occur when anchoring a plated post down. If the concrete is too thin and the anchors are compromised due to freezing and thawing, you may need to place the post into a footing after all.
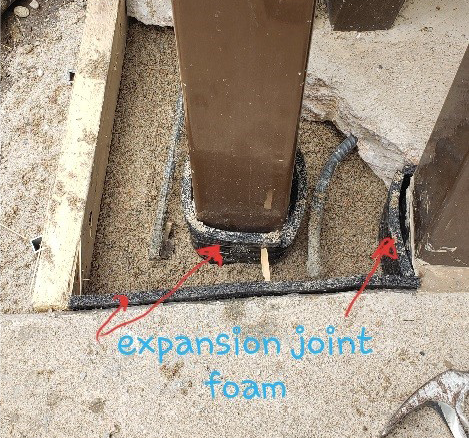
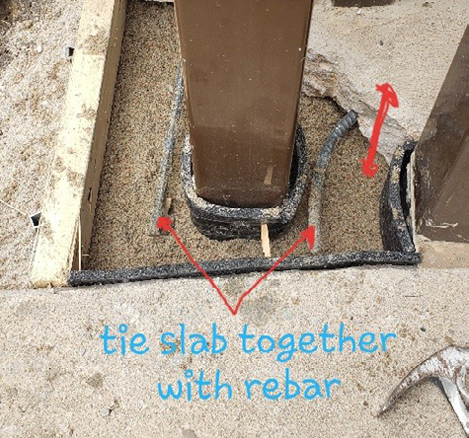
When digging a footing to place a photo eye post, you will what to first have utility locates done. CALL BEFORE YOU DIG. When replacing the photo eye post, you will want to be mindful to not tie your footing concrete together with your concrete slab. Keep them separate. This can be achieved by using expansion joint foam. Place a layer of sand in between the footing, and the new slab keeping them separated. You can use rebar to help hold the old slab to the new slab, so the slab will move as one when the frost hits. Finally, place a sealant around the post and concrete slabs will help prolong the concrete from breaking up again.