Extend Your Wi-Fi Signal To Reach Your Automatic Gate
How to Get your Gate to Connect to your Wi-Fi
We are in an age of technology revolution, which has brought us many brand-new devices that significantly improve our lives. We now can communicate with almost anyone in the world instantly, monitor our health and phone activity from our watch, and immerse ourselves in a wide array of virtual reality worlds. This has occurred not just in the leisure and recreational aspects of our lives, but also in areas like safety and security.
Gate entry intercoms have been on the market for years, allowing someone outside your gate to buzz in to your building and gain access. Now these intercom systems have HD video cameras and calling capabilities, so no matter where you are you can receive a video call from your gate intercom, so you can see who is trying to get through your gate and communicate with them in real time. Not only can you take advantage of this video call service, but you can access the gate intercom’s camera using your cellphone or mobile device at any time, day or night. This offers an extra layer of security as well as additional peace of mind, whether you’re nearby or curious while away on vacation.
Wi-Fi for Automatic Gate Entry
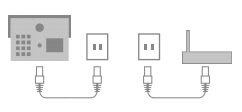
Some of these systems utilize cellular services to provide the most reliable and consistent signal when placing video calls and accessing the gate from your phone. These gate video intercom systems usually work through different popular cellular services, with an accompanying monthly fee for this service. If you are interested in a gate video intercom but would like to avoid a monthly fee, there are video intercom systems available that are Wi-Fi compatible.
While using an existing Wi-Fi signal is ideal for many automated gate owners, it can be a bit challenging if your gate is very far from you modem. Most gates are going to be out of reach of the Wi-Fi signal, and in this case you would want to look into getting a Wi-Fi extender.
A Wi-Fi extender takes your main Wi-Fi signal and repeats it in order to extend the reach of your Wi-Fi. This can push the reach of your Wi-Fi out further onto your property so your video intercom system can connect. Simply plug one of the adapters in near your router, and the second one outside near your gate. Many gate operators come with an outlet you could use to plug in the second adapter, or you can have an additional outlet added.
Benefits of a Wi-Fi Extender for Gates:
- No recurring fees
- Wi-Fi coverage extended out further over property
- Easy installation
- Allows easy connection to mobile devices
- Utilizes your existing Wi-Fi (no need for new service)
- Wireless coverage (no cords necessary)
- Can extend up to 400 ft; even further with a Wi-Fi bridge
American Access Company is happy to work with you to make sure we can get you the right extender to get your Wi-Fi signal to your gate. We will ensure all components of your automated gate—such as your operator, entry devices and gate access accessories—are compatible with your Wi-Fi extender. This guarantees no reoccurring fees and the extra security, convenience and peace of mind that your new gate intercom system with video capabilities will bring. Interested in your own gate video intercom system and would like to explore using a Wi-Fi extender? Reach out to one of our trained experts today for more information or your own free quote.
We proudly offer all gate repair, maintenance and installation services in Sioux Falls, South Dakota; Rochester, Minnesota; Kansas City, Kansas; Grand Island, Nebraska; Omaha, Nebraska; Lincoln, Nebraska; Sioux City, Iowa; and Des Moines, Iowa.
When deciding to install a new fence installed double drive swing gate, cantilever, or slide gate on your property, you may think “Oh I can just get out of my car and open the gates”. However, it’s probably a good idea to leave the option of automating your gate once you tire of manually operating your gate. The best time to set up for gate automation is before a hard surface is laid down, such as asphalt or concrete. Yes, you are still able to install a gate operator after you have installed a hard surface, but it will be much more expensive and complex after the fact.
Getting power on the side of the driveway can be done in a few different ways:
- Install a conduit under the driveway before the hard surface is laid down
- Horizontally bore under the driveway
- Saw cut out an area in the driveway and lay down the conduit
Install Under the Driveway
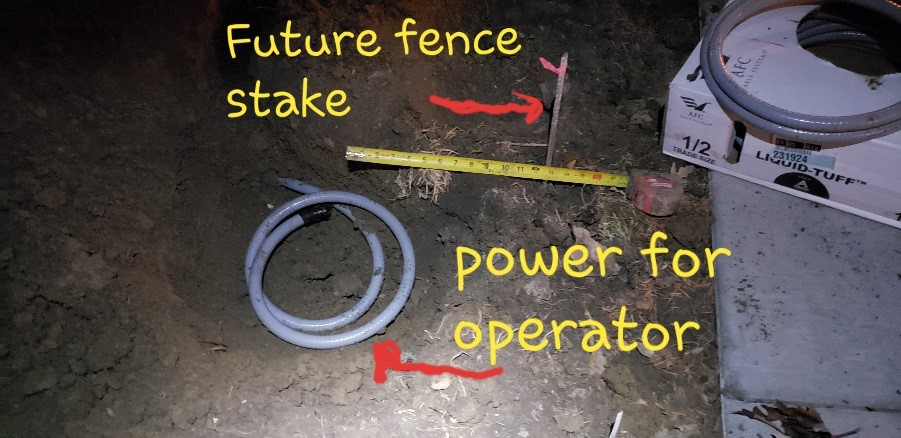
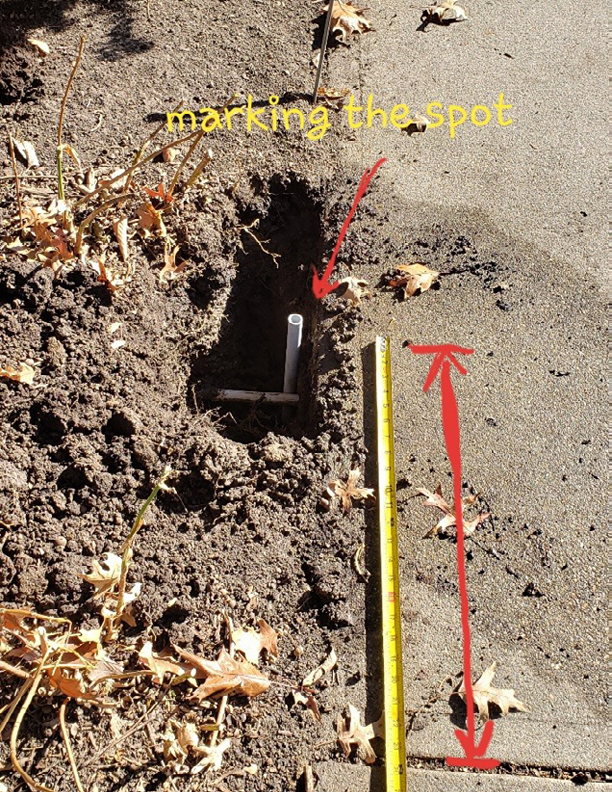
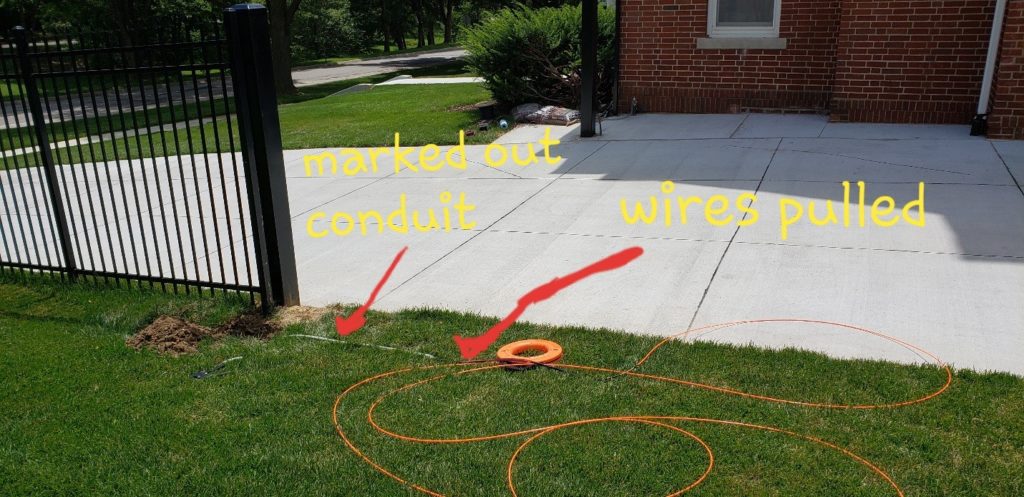
Installing the conduit under the driveway before the hard surface has been laid down is the most cost-effective option. When the area is open, it is a good idea to install a few conduits stubbed out on each side of the drive. The conduit can not only be used for power, but you may need to use the conduit for a water line for sprinklers. Of course, you will not want to install power and high voltage power in the same conduit.
Bore Under the Driveway
Getting under the driveway can be done with a horizontal boring machine. This may be expensive, but it’s the best means after the concrete is poured. Horizontally boring takes a special machine. You can hire someone to perform this work or you are renting a small handheld unit that can used with a Little Beaver power unit.
Saw Cut the Existing Driveway
The third option can be less expensive and may be your last resort. Saw cutting into the hard surface and repouring the concrete or asphalt back in can seem like an okay idea, but in the long term this can cause more issues with the appearance of the drive. In the Midwest, it is very common that freezing and thawing causes damage to the repoured surface. All and all, the best option would be to think ahead and install conduits under the driveway before it is poured or laid.
The size of the conduit and the amount of conduit will be also need to be determined. An electrician can help you figure this out.
After placing conduit under your driveway, it is a good idea to take pictures of the conduit with measurements of where it was placed and how deep it was installed. Taking pictures with measurement and will help you come back and find the conduit in the future when deciding to install that operator that you though you may not want.
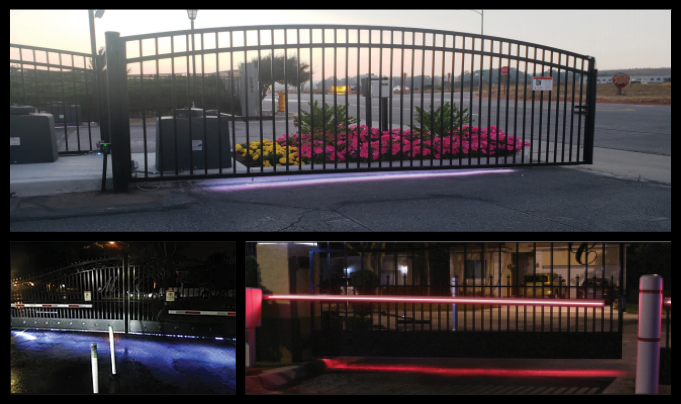
Unlit gates often hit people, and people often hit unlit gates. Ornamental gates, especially black gates, are difficult to see at night, and drivers aren’t always great at gauging when the gate is fully open
American Access Company offers LED automated gate light kits to illuminate your gate and signal to drivers when it is safe to drive through. These swing gate and slide gate light kits put attractive LED lighting on heavy gates. Your gates are very expensive to build, install, maintain, and repair. As an owner, you should do whatever necessary to keep cars off of your gates, since expensive damage to gate and cars is inevitable if they touch.
Benefits of LED Gate Lights:
- Significant reduction in gate-vehicle accidents
- Improves gate visibility for bikers, pedestrians and drivers
- More appealing gate appearance
- Low voltage means no install permit needed
Interested in using this super simple product to prevent any damage to your gate or incoming cars? Request your free custom quote from our specialists today!
Nothing is more frustrating than pulling up to your gate and it will not open. You are stranded. You cannot get in and out. Your family, employees, service providers are all at a complete standstill. Below is your quick How-To Guide to walk you through the steps to get your gate open. This is not a cure for repairing your access control system, but only a quick means to get your gate open in an emergency.
Step One – Try your access device again
Your transmitter, remote, keypad, push button, card reader, etc. If using a transmitter or remote, replace the battery like you would on your garage door remote or car’s key fab. Look for any lights on the devices that may be a clue to whether or not the device has power.
Step Two – Check for power
Start at the gate operator. Pull open or off the cover and look for the power indicator light on the circuit board. Make sure the “on” switch is on. If there is still no power, identify the circuit breaker panel that includes the dedicated circuit for your gate operator. Even if is appears to be on, cycle it on, off and on.
If there is still no power, check to see if your operator has an overload fuse. Check the fuse and replace if necessary. If there is still no power, you must call an access control technician. If there is no evidence of power at the gate operator, you may also want to call your electrician as the problem may not be at the gate operator and may exist somewhere in-between with the wiring.
Has anyone recently dug, trenched or cut where the power may travel from the gate to the circuit breaker panel? Please go to Step Five to immediately access your gate.
Step Three – Have power but nothing is happening
You have power at the gate operator’s circuit board. Check your circuit board for any obstruction devices that may have been triggered. Are your photoelectric eye(s) aligned? Check to be sure there is a green light on the face of the device.
Do you have a gate safety edge on the front or rear of the gate? Remove the cover and check the indicator light on the device. Replace the batteries. If the indicator light is on but there is no evidence of contact, you may want to disconnect the edge wiring from the transmitter to see if the edge is faulty. Contact your access control technician to assist you. Please go to Step Five to immediately access your gate.
Step Four – Have power and the motor runs but the gate will not move
You may have a bad gear box, broken belt or chain, worn shaft, etc. You will have to contact your access control technician to assist you. Please go to Step Five to access your gate.
Step Five – When all else fails
If you can no further self-diagnose and repair the gate operator but need to access the gate, you will have to release the gate from the operator. Turn off the power at the gate operator and at the circuit breaker panel. Lock-out the panel so the operator cannot be re-energized without the proper authority. Look for a disconnect lever inside the gate operator. It is typically toward the bottom and the lever may be red in color. Pull the lever. This should disengage the motor from the gate and allow you to manually push open the gate. If there is no lever, you may have to disconnect the chain from the gate. On one end, remove the nuts that hold the chain tensioner and thread the chain through and off the gate operator’s guide and drive sprockets. Reconnect the chain at the end and slightly tension so it does not rub on the ground. You should be able to manually open the gate. If a swing gate, you should be able to disconnect the turret arm from the top of the operator.
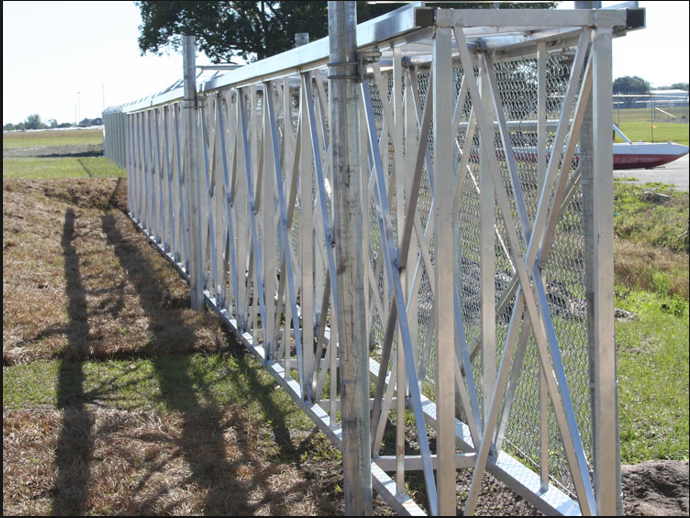
Standard single and double track aluminum cantilever gates are excellent for your standard slide gate for residential and commercial properties. However, once openings get wider, gates get taller, additional wind load is added, a standard cantilever slide gate may not be enough. This is where box framed cantilever gates are necessary.
Box framed cantilever gates are much like two regular cantilever gates joined together 24” apart and held together by a series of square tubes and several diagonal trusses. This creates a very rigid overall framework to withstand higher weight or wind loads. Box framed cantilever gates are typically used for openings longer than 50’, when the height exceeds 8’, or when the gate infill material is solid, creating considerable wind load.
Automation
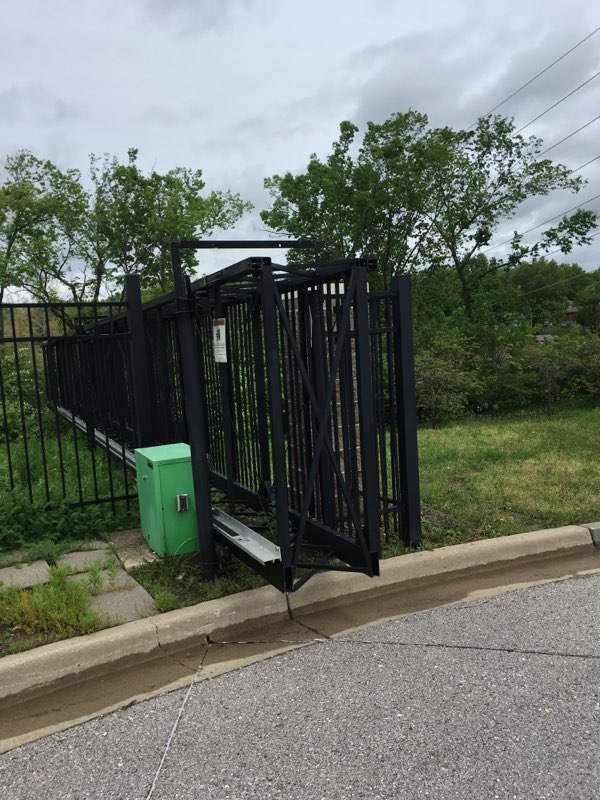
Box framed cantilever gates are very large and heavy by design in order to withstand the size and wind load requirements. Box framed cantilever gates are essentially two cantilever gates forming a box truss design, so these gates have different automated gate access control compared to a standard cantilever gate.
Before you can even begin installing any automated gate equipment on your box framed cantilever gate, you must first verify the box framed cantilever gate is functioning correctly. If it is not and you install a gate operator, it could damage the gate operator, the rollers and the track due to its considerable weight and girth. To determine if the gate is functioning correctly, it should be able to be opened and closed by a large adult manually with a reasonable amount of force.
This is specific to box framed cantilever gates because the extra weight of the gate is likely going to make the gate posts bow inward and cause excessive and premature wear on the rollers and tracks, and potentially even overload the gate operator. This may not be immediately noticeable, but if not prevented will occur over time.
To prevent this wear and tear, it is a good idea to install a brace over the top of the gate between the adjoining gate posts. This keeps the posts from bowing inward and creating extra stress on the gate equipment and operator.
Selecting an Operator
Due to the excessive length of a box framed cantilever gate and resulting extra weight, you cannot use a gate operator manufacturer’s standard charts to choose your box framed cantilever gate operator. These charts usually suggest your gate operator based on either the length of the cantilever gate or the cantilever gate’s weight. Since a box framed cantilever gate is technically composed of two cantilever gates, these charts may not select the best gate operator that is powerful enough to consistently move the gate.
At American Access Company, we suggest you multiply both the gate length and the gate weight by 1.5 when using these charts to choose an operator to support larger size. Once you do this, it’s likely you’ll find that there is a limited number of gate operator manufacturers that can accommodate a large box framed cantilever gate. These large gates typically require a 2-horsepower motor or hydraulic drive system.
Installation
While there were some discrepancies in how you determine which gate operator is right for your box framed cantilever gate compared to a standard cantilever gate, no such discrepancy applies for the location of the installed gate operator from the face of the gate. Whatever the guidelines are for the particular gate operator you choose, follow those exactly when installing your automated gate controls for your box framed cantilever gate.
One facet of automated gate controls you will have to adjust during installation is the obstruction sensitivity. For standard cantilever gates, the obstruction sensitivity is usually set high. However, a box framed cantilever gate is heavy and creates a lot of resistance. This will generally cause more pull on the operator which could easily trip the obstruction sensitivity. It is important to take more consideration when setting the obstruction sensitivity when installing the automated gate controls for your box framed cantilever gate.
After Care
Once your gate operator is set and working correctly, it’s imperative to take specific safety parameters into consideration. Box framed cantilever gates, by design, are 20” – 24” wide. The UL 325 provisions for providing contact and non-contact sensors don’t fit the parameters for box framed cantilever gates. Install additional photo eyes of sensors to account for the extra-wide gate profile to prevent run-ins with vehicles and to ensure pedestrian safety.
Box framed cantilever gates are very large and very heavy, and even after installation is complete and the gate is in operation it is imperative that there is continuous maintenance and inspections performed. This is to ensure there is no premature wear and tear on the gate operator, trucks or tracks.
Once you begin the process of installing a pave-over or a saw cut in loop, you should always test the loop prior to installation.
Pave-Over Loops or Saw Cut In Loops
First you have to determine which loop you will install. When choosing which type of loop to install, you must look at how far along you are in your project. A pave-over loop will be installed in the pavement, whether it is mounted to a rebar grid or placed on the ground and paved over.
Pave-Over Loops
Before paving over the loop, you will want to test the loop with an ohm meter by placing one lead onto one of the wires of the loop and the other lead from the ohm meter to the other wire of the loop. Through this process, you are testing for continuity through the loop.
If you do not have continuity through the loop, the loop may be bad. If placing the loop on a rebar grid, you will not want to tie it inline with the rebar. This means to offset the loop so it does not follow the rebar grid. This will affect the way the loop will react to a metal object over top of it when the project is complete. If you are placing the loop on the ground then paving over it, you must secure the loop to the ground in a manner that it will not move when pouring the pavement over top.
Saw Cut In Loop
When choosing a saw cut in loop, this can be done before or after the pavement is poured, but installation can only happen after the pavement is poured. Saw cut in loop is installed just like it sounds, saw cut into the pavement and then sealed. You will need to use the proper saw blade that is made for the pavement that you will be placing the loop into. For example: For concrete, you will want a blade that is meant to cut concrete. For asphalt, you will want to use a blade that is meant for asphalt or a combination blade that can be used for both concrete and asphalt. If you are going to be using an electric circular saw, make sure that the blade is designed for dry use cutting. Don’t forget the dust mask, safety glasses, and gloves!
The saw cut will then need to be cleaned out using a brush or blower. After cleaning the dust and debris from the saw cut, place the loop into the saw cut according to the instructions from the manufacturer. Then test the loop with an ohm meter by placing one lead onto one of the wires of the loop and the other lead from the ohm meter to the other wire of the loop. You are testing for continuity through the loop.
Loop Sensitivity
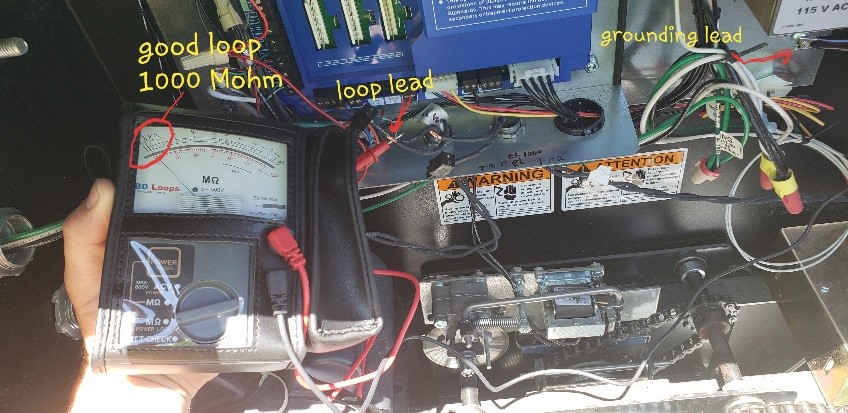
So, you have the loop installed into the pavement or into a saw cut and you are looking to test the loop for sensitivity to metal. There are a couple of testing meters that you can use that will test different aspects of the loop. One will be the ohm meter or multimeter that will test ohm. This is performed by removing the lead ends for the loop detector and then placing one of the lead ends from the meter to one of the wire ends of the loop, and then placing the second lead end from the meter to the other wire end of the loop. Many multimeters will have a tone that will sound when there is continuity. If your meter does not have a tone, another indication is that the meter needle will spike. This is indicating that the loop does not have a break in the wiring.
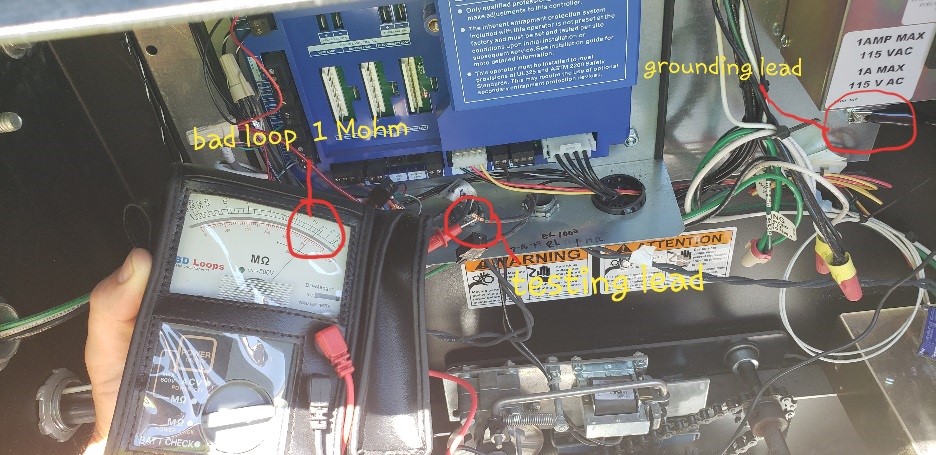
Another way to test the insulation of the loop is a Megohmmeter. This meter measures the electric resistance of insulators. This will help determine if the insulation of the loop has a cut or if water is getting into the loop causing it ground out and fail. This meter’s lead ends will not both go to the loop. One lead end will go to a ground or case ground and the other lead end will be placed on one end of the loop. This is a meter that is putting out power so when testing the loop do not touch both leads at the same time. When testing a loop, you are looking for a high reading of 45-2000 Megaohms. A range of 0 to 10 M ohms means the loop insulation is bad, and 10-44 M ohms means the loop insulation is questionable.
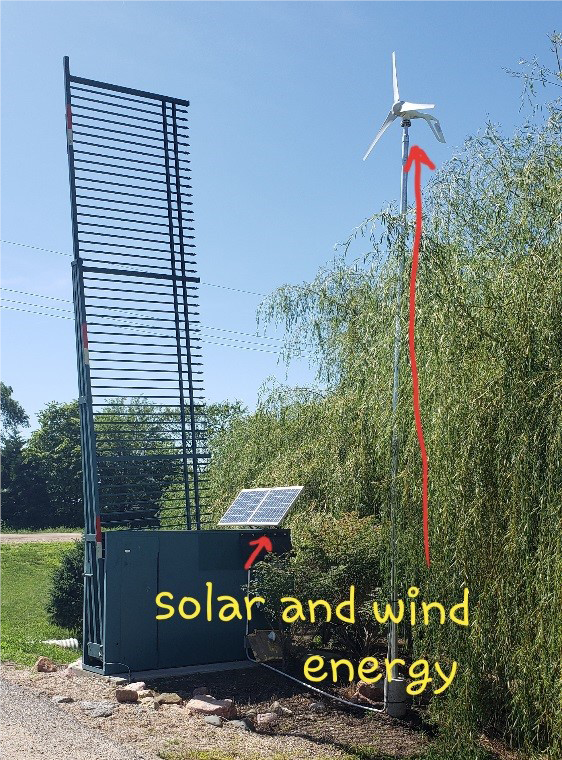
As alternative power sources have become more and more available to the average consumer, it can be easy to see why interest has grown in using them to replace classic power options. Solar panels and windmills naturally generate power using either the power of the sun or wind. These are not only Earth-friendly power options, but can be economical as well. These options were often considered as options for remote areas without easy access to local power, but have become more affordable and accessible and are being used widely in areas with easy access to other power options.
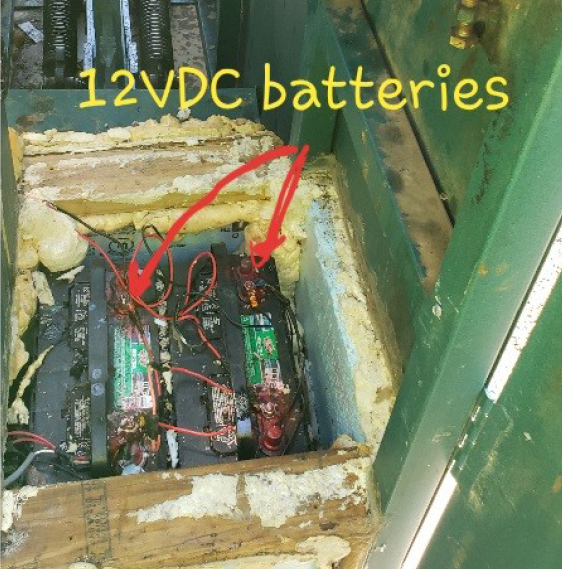
Choosing a gate operator to help secure your property can be a challenge, but it can still be easy to keep the cost low when you’re aware of your array of options. Many gate operator manufacturers have the option of AC power, DC power, or both AC power with DC power battery backup units. Having a professional out to look at your site and help you figure out your options may be the best way to determine what power source would be best for you.
If you know that you have access to DC power or AC power, then your power source decision should come down to a few more questions.
- Where are you getting power from?
- How far away is the power source?
- How do you get the power to the gate?
- Does the power need to come over head, underground?
- What is the cost?
Even though it may seem like it would be easier to just put up a solar panel and a windmill rather than to hard wire your power from the grid, the decision to use alternative power also comes with questions.
- How many times are you going to be cycling your gate per day?
- Do you have enough wind in a day to keep the batteries charged?
- Do you have enough hours of direct sunlight to charge the batteries?
- How big of batteries do you need to keep your gate operating?
- Is there space and cabinet for larger batteries if needed?
- How often do you need to replace the batteries and the cost of the batteries?
The list can go on and on depending on the climate you may live in. Before you decide on what power source you should use to power your automated gate, you may want to look over these questions and weigh your options. Other factors that play a role in this is your region. Sun light hours and wind averages can be found online for your region, if you are looking into using the renewable resources.
Every so often it may feel like instead of your automated gate working with you as intended, it is working against you. You may try troubleshooting it for hours before giving in and calling in the professionals. It can be frustrating to have to pour more time and money into your automated gate.
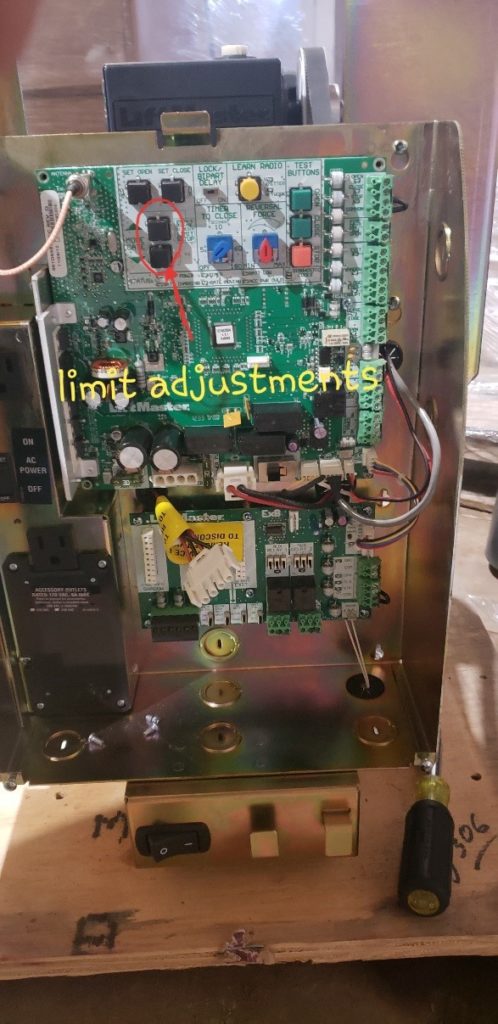
There are a few things you can keep an eye on and adjust to help you save your hard-earned money. If you keep the limits of your gate set properly, it will help prevent unwanted gate stopping, keep your items from wearing down, and keep your gate from misaligning. You may not have been aware of how much of a difference limits make in your gate’s movement.
Here are just a few of the things that can be caused by stop limits that are set improperly:
- The gate can damage the roller covers causing someone to get injured if they place their hand on the gate while it’s in motion
- The gate may fall off of the track, rollers, or trucks that support the movement. This also can cause injury or even death
- The gate could damage a stone column if the gate is over traveling
- Unadjusted limits may prevent the gate from closing all the way, which could lead to your pet escaping
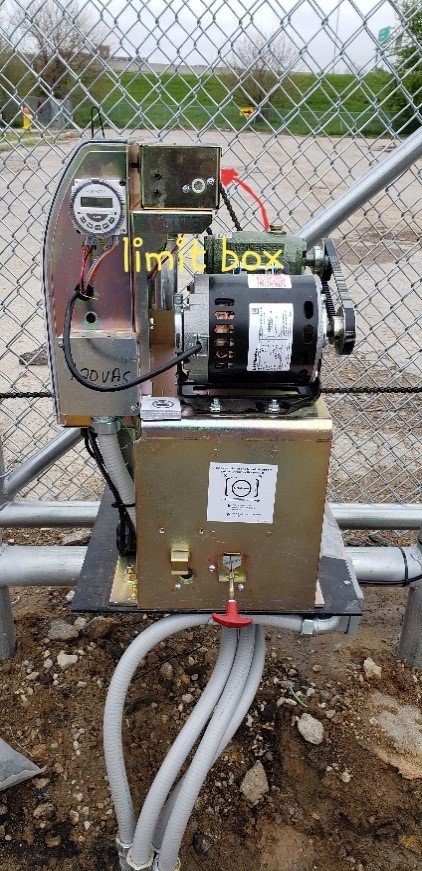
Where do I adjust the limits?
The best place to look for instructions on adjusting the limits would be your owner’s manual.
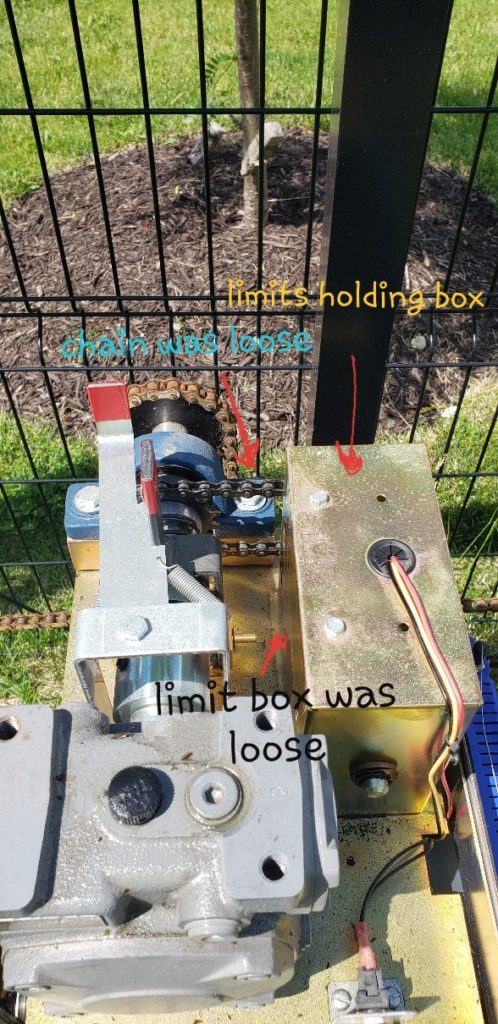
- There are many influences that can cause the limits to come out of adjustment, including:
- If the gate is chain driven. The drive chain needs to be at the correct tension. Refer to owner’s manual for more information
- If the nuts are worn out and slipping on the supporting
- If the limit switch boxes become loose
- If a limit switch wears out
Make sure to pay attention to the gate is stopping in both the opened and closed positions. Is the gate stopping in same spot every time, or is it stopping in random spots? If the gate is stopping in different spots each time or in random spots, the list above may help troubleshoot this issue. If you still have issues after checking the items off this list, it may be time to call in the professionals. Reach out to American Access Company through our contact us page and we will be glad to offer you our services
If you’re in the process of making the decision to install or have an automated gate company install an automatic gate on your property, it can feel like you’re remodeling a kitchen. You have to figure out what style of gate you want (ornamental or chain link), what type of gate (swing, cantilever, slide or vertical lift gate), and choose from an infinite array of colors.
Pairing Gate with Access Controls
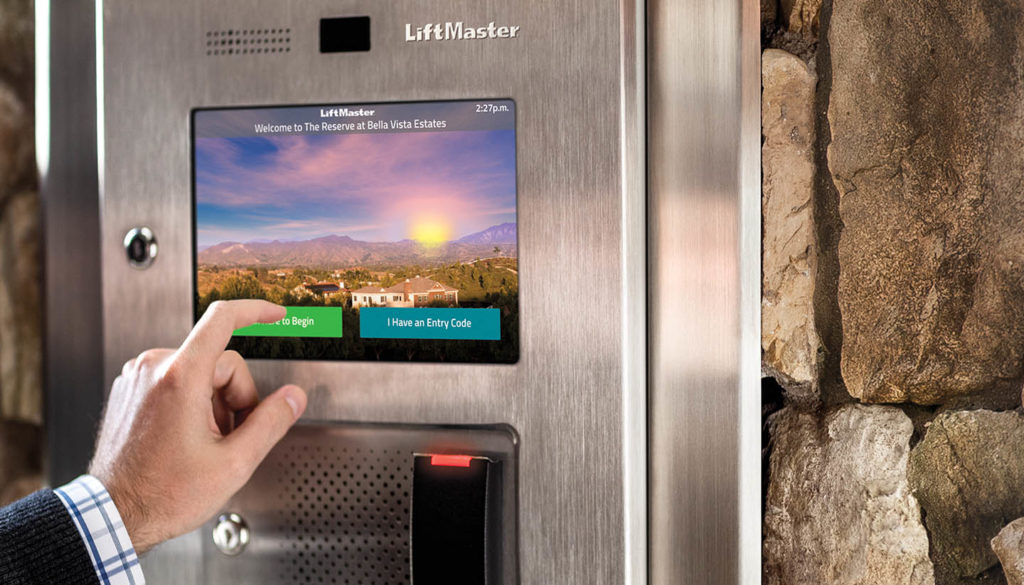
After you’ve made your decisions on your automated gate’s style, type and color, then you have to figure out what kind of access controls you want for the gate. There are several excellent brands of gate operators, including HySecurity, LiftMaster and Linear Osco. You also need to decide if you want the gate operator off the ground, mounted to a post structure, mounted to a riser stand, or mounted on a concrete pad.
While you’re making all these decisions, you need to ask yourself whether all these factors and components will work together. Below is an example of some decisions a customer might make:
Style: Chain link gate
Type: Cantilever
Color: Black
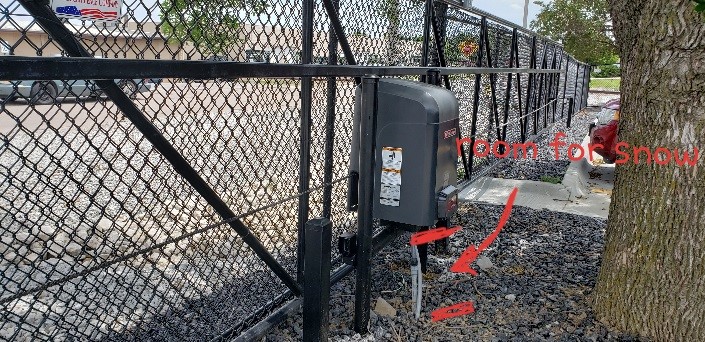
Operator: LiftMaster
Mounting: H stand
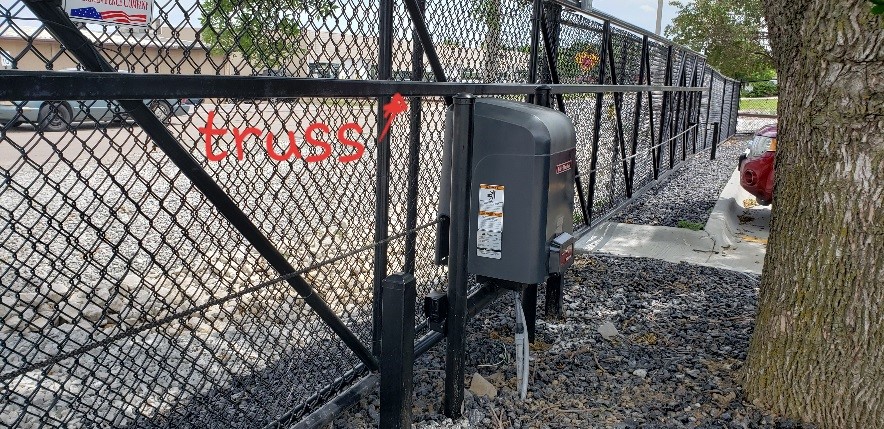
Putting this combination together looks great. The operator is a great name brand and the H stand will help keep the snow from covering the operator in the snowy months in the Midwest. Looks perfectly planned out, right? No, you need to understand how the gate will be constructed.
Complementing Parts
Knowing how the gate will be constructed may change a few components of how the operator is placed on a stand or on a concrete pad. Depending on the length of the cantilever, it may need to have a truss welded on the plane of the gate to stiffen the gate up as it travels back and forth.
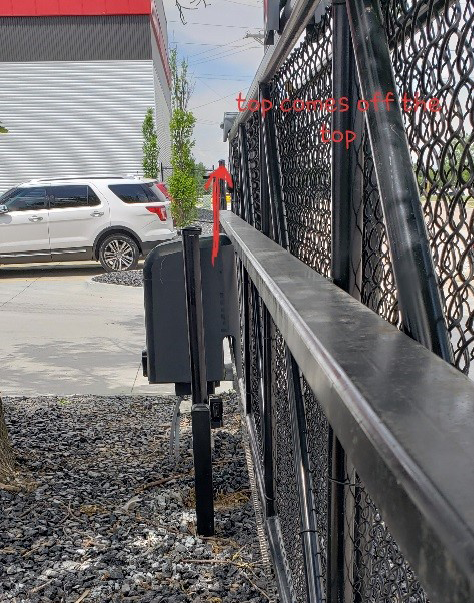
Wind can be an obstacle when your gate is in motion. A swaying gate can trip the safety device such as a photo eye, sending the gate in the opposite desired direction. The truss is a very important structure to have welded on the gate, but can also get in the way of the operator if you would like to keep the operator up and off the ground. Knowing how the operator enclosure is removed and/or opens is one of the components that can get over looked.
As a whole, there are many decisions to be made and you need have them all synchronized for a smooth installation. However, these are not the only questions you must ask yourself before moving forward with installing an automated gate.
Leave it to the Experts
American Access Company is an expert in automated gate installation, repair, maintenance and design. We keep every slight detail in mind to make sure you have the most efficient and trouble-free automated gate as possible. Request a free quote or contact us today to see how we can be beneficial for your automated gate project.
Accidents do happen when different contractors are involved all on one project. As the projects reaches or even extends past the deadline, the pressure tends to lead to mistakes. You don’t want any accidents to occur because someone is trying to rush their job. Most accidents can be fixed or mended, but you likely can’t fix a lost lime or even a life. If you’re ever tempted to rush a job, remember that it will ultimately be easier to work safely and efficiently.
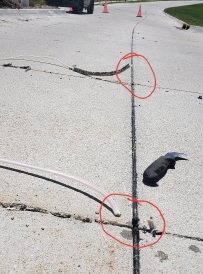
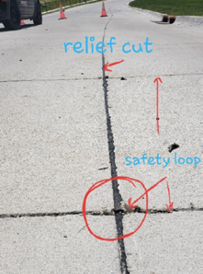
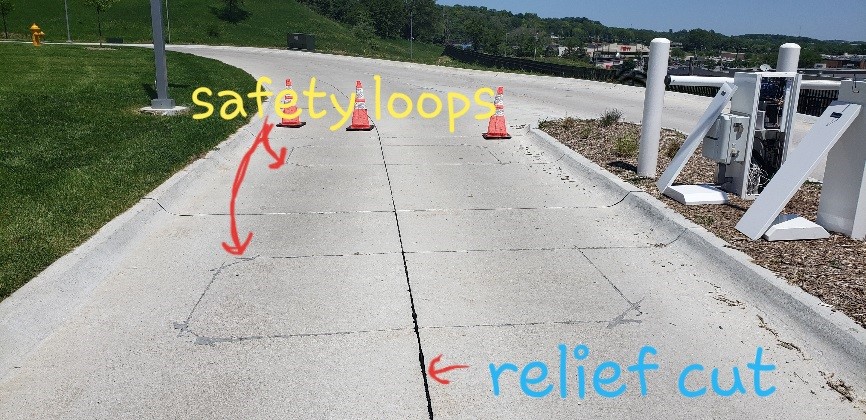
When accidents happen between two contractors’ scopes of work, they can typically be resolved with an easy solution or a repair or replacement of damaged items. For example: On a recent American Access Company project, after conduit had been laid out and concrete had been poured for walkways and driveways, it was time for us to install the gate access controls. After the access controls were installed, then it was time to install the safety devices, which can consist of photo eyes, safety edges, panic hardware, safety loops, or vehicle sensing devices.
Product Familiarity
Some of these devices are not common enough to be known by every contractor. This is not any different than if someone was explaining how to build a rocket ship. You may not know what the items do or even what they are for or how they are installed. When there is this uncertainty and lack of product knowledge, accidents happen.
Accidents Can Happen
After we installed the the safety device, the safety loops are saw cut into the concrete in order to open the gate as a car drives over the loop. So, in this example you will see the concrete relief cuts being cleaned and filled after the loops were installed, sealed and in operation, which can cause an accident. The cost of this accident consisted of replacing 3 loops, fuses, and one control board. Luckily, no one was hurt.
This incident was caused because the loops were installed after the relief cuts were cut. Then the weather had turned cold, and the cuts were not filled in until the spring. Before we could fill the relief cuts, they needed to be cleaned out. Since the team used a saw to clean out the saw cuts, it also cut through the safety loops. Cutting through the safety loops caused the operators to work improperly, blew a few fuses and caused a control board to malfunction.
Keeping this example in mind, it would help to be mindful of another contractor’s work. If you are ever unsure of another contractor’s work, ask questions. We resolved this by removing of the existing loops and board, and then replacing the loops and board.